News Ticker

Menu

Browsing "Older Posts"

Browsing Category "easy make"

How to Make Rice Pudding

Tuesday, 26 May 2015 / No Comments
Hello every one… how was your day?
how to make rice pudding
Image taken from srilankanrecepies
Well, in my place rice is one of the main food that we eat every day. we eat rice and vegetables, chicken, fish, and many more. But do you know that we can make a creamy pudding by rice? Check the recipe below…

Ingredients:
3/4 cup uncooked white rice
2 cups milk
1/3 cup white sugar
1/4 teaspoon salt
1 egg
2/3 cup golden raisins
1 tablespoon butter
1/2 teaspoon vanilla extract

Steps:
1. Firstly you need to beat the egg.
2. Pour the rice into boiling water. Reduce the heat to low, simmer for 20 minutes.
3. In the other place , combine 1 1/2 cups cooked rice, 1 1/2 cups milk, sugar and salt. Cook over medium heat until thick and creamy, 15 to 20 minutes.
4. Stir in remaining 1/2 cup milk, beaten egg, and raisins; cook 2 minutes more, stirring constantly.
5. Remove from heat and stir in butter and vanilla.

Now your creamy rice pudding are ready to enjoy. you can add cinnamon at the top of your rice pudding. This will be a great pudding to your family..
See you next time…

How to Make Pineapple Pudding

/ No Comments
Hello everyone, how was your Monday? Monday is not always such a monster day right? If you can doing everything you like. Well, we already talked about some kind of pudding such as tofu pudding, banana pudding, panna cota, and so on. This time again and again will talk about the other fresh pudding. this is about Pineapple Pudding. let’s try the recipe at home…
how to make pineapple pudding
Image taken from honestcooking

Ingredients:
1 can (14 oz.) condensed milk
1 3/4 cans water (use the condensed milk can)
3 tsp gelatin (10g)
3 tbsp corn flour
2 tbsp sugar
1 Pineapple medium size
Raisins
1 tsp vanilla
Colouring (yellow is preferred)

Steps:
1. Peel and slice the pineapple into small pieces.
2. Cook the pineapple. Add the sugar and a bit of water. But if you use fresh pineapple you don’t need to add the water. Cook until the color of the pineapple changes to a bit fade. Wait until cool.
3. Dissolve gelatin in a small amount of warm water and keep aside.
4. Dissolve corn flour in water until all the flour is dissolved and keep aside.
5. Cook milk and water and keep stirring until it boils.
6. Add vanilla, pineapple, colouring and raisins and keep continue stirring.
7. Add cornflour and keep stirring.
8. When the mixture become thickens turn off the fire and add gelatin.
9. Pour the mixture to a dish. You can garnish with the other pineapple and raisins.
10. Refrigerate until 5-6 hours.

And you have your own fresh pineapple pudding. happy cooking everyone.. next time we will share about the other sweet pudding…
Have a great life…

How to Make Panna Cotta

Monday, 18 May 2015 / No Comments
Happy weekend everyone…
This time I want to share about the steps to make our smooth Italian dessert panna cota. Have you try this before? I think it so easy to make by yourself at home. Let’s see the recipe below…
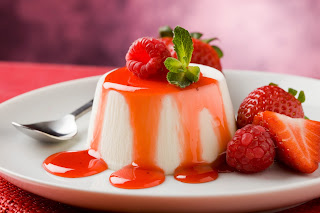
how to make panna cotta
Image taken from: laurainthekitchen.wikia.com

Ingredients
1/3 cup skim milk
1 (.25 ounce) envelope unflavored gelatin
2 1/2 cups heavy cream
1/2 cup white sugar
1 1/2 teaspoons vanilla extract
Steps
1. Cool the ramekins uncovered at room temperature. When cool, cover with plastic wrap, and refrigerate for at least 4 hours, but preferably overnight before serving.
2. Stir the milk and gelatin powder in the small bowl. Set milk mixture aside.
3. In the other place, stir the heavy cream and sugar in a saucepan, cook in the medium heat.
4. Cook it until full boil. When it full boil, pour milk mixture into the cream, stirring until completely dissolved. Cook for one minute and keep stirring constantly. Remove from heat.
5. Add the vanilla, and stir it.
6. Pour it into the ramekin dishes.
7. Cool the ramekins at room temperature. When cool, cover the ramekins with plastic wrap and refrigerate at least 4 hours or it will be better if you can refrigerate it for one night.

After you refrigerate the remekins, your panna cota are ready to serve. It will very nice if you can make any sauce from fresh fruit, my favorite is strawberry sauce.
Have a nice day…

How to Make Mango Sticky Rice

Friday, 15 May 2015 / No Comments


Image taken from: thekitchn.com 
Happy happy happy Friday… such a really good day if we can meet our friend and make a noise with them. Its very common if you make some snack while you gathering with your friend. I just found a good classic thai food that easy to make and also very delicious. This food is contain mango, if you can’t find mango in your place you can change the mango with other tropical fruit that similar.

Here we go…

Ingredients:

1 ½ cups sticky rice
1 ½ cups canned or fresh coconut milk
½ cup palm sugar, or substitute brown sugar
½ teaspoon salt
2 ripe mangoes

Steps:
1. Before you cook the rice, you need to soak the rice in the water for 20 minutes to 4 hours. Drain the rice, and cook. You can cook the rice by steaming in the rice cooker or cook the rice on the stovetop.
2. In the other place, heat the coconut milk on the low medium heat until it is hot, but not until it is boil. Remove from heat, add the sugar and salt.
3. When the rice is cooked pout ¾ cup of the coconut milk mixture over the rice. Stir the rice and the coconut milk and make sure they are mixed. Let it sit for 20-30 minutes to blend the flavors.
4. Peel and slice the mango into thin, long portions.
5. Place a scoop of sticky rice in a bowl. Put a few slices of mango on the top or side. Drizzle the coconut milk on the top to taste.

And your sweet mango sticky rice is ready to eat. I’m sure you can make this dish to the children too and they will enjoy the mango soooo much…


have a great day…

How to Make Mango Lassi

/ No Comments
Hello guys… I just found an unique beverage from India. I think you can combine this beverage with our recipe before, mango sticky rice. The beverage is called as mango lassi. Its so much easy to make. Just check the steps below.
Mango Lassi
image taken from: silk.com

Ingredients:

·         1/4 cups plain low-fat yogurt
·         1/2 teaspoon freshly-squeezed lemon juice
·         1/2 cup fresh mango
·         1/3 cup cold water
·         1 to 2 tablespoons honey or sugar
·         9 to 10 standard-size ice cubes

Steps:

1.       Prepare fresh mango, peel and remove the flesh. Cut into the small pieces. And juice it.
2.       Juice the mango with yogurt, lemon juice, mango pulp, water, and honey or sugar. Blend approximately 2 to 3 minutes or until you see a little forming in the mixture. Add the ice. You can blend the ice or just pour the ice cube in the drink.
3.       Pour the juice into glasses.

Your lassi is ready to serve. It will be so much good if you anjoy a glass of lassi in the hot day. it is so healthy also.
Happy weekend…

5 Fun Lunch Ideas For Kids

Thursday, 14 May 2015 / No Comments
Hi there! So, my neighbor is having problems with her kids cause they wont finish their lunch or wont eat them at all. Her kids told her, that they are tired of the same lunch everyday, which is: jam filled bread. So, i think this ideas of fun lunch will help her with her kids lunch!!

5 Fun Lunch Ideas For Kids

5 fun lunch
Image taken from: clipart

  1. Melted Cheese and Smoked Beef Roll: This is easy to make if your a busy mother. Roll up a slice of Cheese topped with 2 or 3 slices of Smoked beef/Bacon in a slice of white bread. Make sure to roll it tight or secure it with toothpick while baking it. bake it for 5-10 minutes until the bread is golden and the cheese is melted. if your using toothpick, don't forget to remove it!
  2. Caramelized Fruit: Melt some sugar with water and while it's still hot pour the caramel liquid to the Fruit that you've (or your children) chosen. Don't over cooked the sugar while melting it, otherwise it'll burnt and taste bitter. it also is not good for your kids health. If you have a caramel syrup, you can put it in a different container so the syrup will act as a sauce.
  3. Character Shaped Sandwich: You can use your favorite Sandwich Recipe, just mold/form your bread into you kids favorite character. You can find various bread Molder online with various character.
    food for kids
    Image taken from: buznet
  4. Cheese Coated Vege: You can use any vegetable and your kids would still love this! Cook the vegetable that you chose until half cooked. Then put it in a pyrex pan or any Oven-able pan. Put some Cheese on top of the vegetable, then bake it for 10-20 minutes until the vegetable is cooked and the cheese melts.
  5. Oven Baked Macaroni Cupcake: This is your ordinary Mac and cheese recipe. or you can use any macaroni recipe that you like. The only difference is, after you cook you macaroni, put them in to a cupcake pan, then bake them for 10-15 minutes just so the shape stays.
fun lunch with kids
Image taken from: iowagirleats


So, i hope this article helps you with your kids lunch. If you have any other creative ideas of kids lunch, be kind to share with us. And don't forget to Tell us what to write next on the comment section.


Until Next time! BYE!!

How to Make Ice Cream Without Machine

Thursday, 7 May 2015 / No Comments
How to Make Ice Cream Without Machine
Image taken from: snowy
Hello everyone. As I told you before I will share about how to make ice cream without ice cream machine. Ice cream has founded far before the electricity, so actually the original ice cream before was made without the machine. At home we are definitely can make delicious ice cream by our own.

These are the steps:

1. Prepare your ice cream mixture, then chill it over an ice bath.
2. Put a deep baking dish, or bowl made of plastic, stainless steel or something durable in the freezer, and pour your custard mixture into it.
3. After forty-five minutes, open the door and check it. As it starts to freeze near the edges, remove it from the freezer and stir it vigorously with a spatula or whisk. Really beat it up and break up any frozen sections. Return to freezer.
4. Continue to check the mixture every 30 minutes, stirring vigorously as it’s freezing. If you have one you can use a hand-held mixer for best results, or use a stick-blender or hand-held mixer. But since we’re going low-tech here, you can also use just a spatula or a sturdy whisk along with some modest physical effort.
5. Keep checking periodically and stirring while it freezes (by hand or with the electric mixer) until the ice cream is frozen. It will likely take 2-3 hours to be ready.

Making the ice cream is so simple right? Enjoy your own ice cream.
See you next time…