News Ticker

Menu

Browsing "Older Posts"

Browsing Category "Cheese"

How to Make Cheese Pudding

Tuesday, 26 May 2015 / No Comments
Hello friends…
how to make cheese pudding
Image taken from http://www.mrhmouse.co.uk/recipes.htm
Do you like cheese? We can eat cheese in so many ways. And this time we I want to share the recipe to make cheese pudding. I think it will be interesting because its different with cheese cake. Just check the recipe below…

Ingredients:
2 pints milk
4 ounces fresh breadcrumbs
1 lb cheddar cheese, grated
 8 eggs
1 teaspoon French mustardsalt
freshly ground black pepper

Steps:
1. Boil the milk in a pan.
2. Put the breadcrumbs in a bowl and add the milk over.
3. Add the cheese and stir.
4. Add the eggs and mustard to the milk mixture. Lightly beat.
5. Add seasoning. Blend with the mixture.
6. Spread the butter in the ovenproof dish and pour the cheese pudding mixture.
7. Bake in the oven at 350 F for 45 minutes until lightly set and golden.

And your cheese pudding is ready to eat. Happy cooking. Have a nice day…


5 Ways to Enjoy your Strawberries

Friday, 15 May 2015 / No Comments
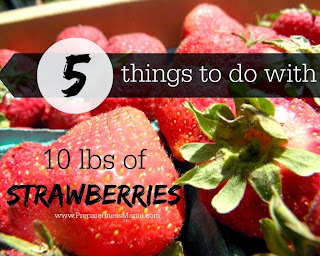
Hi there Everyone! I am craving for Strawberries these days. But i haven't had the Time to go fruit shopping. So, as usual, i will vent my craving here! And these are 5 ways i'm going to enjoy my Strawberries when i got them!!

5 Ways To Enjoy Your Strawberries
Strawberries
Image taken from: preparednessmama

    1. Sugar Coated: The first and the easiest way to enjoy your Strawberry is to sugar coat them. Wash your freshly picked (or bought) Strawberries, remove the leaves on the top, put them in to a bowl, then cover them with sugar! YUM!!
    2. Chocolate Coated: Second easiest and most delicious (for me at least) way to enjoy your Strawberries is to chocolate coat them! So, wash your strawberries, and melt some White or Chocolate Chocolate, then dip your strawberries to the melted chocolate. Put them on a plate then put them in the fridge for 10-15 minutes. And your chocolate coated strawberries is ready to eat!
    3. Juiced: If you want something to drink something cold and sweet, you can also have your strawberry juiced. Cut 5-6 strawberries into half, then put them in to the blender with one glass of water and ice. Then blend them until smooth. You can also add another fruit such as Blueberries, Raspberries, and Banana. Or you can Pour in a couple drop of mint extract and your Strawberry juice is done!
    4. Yogurt Popsicle: This is a little bit more complicated, but it's worth the tire when you taste it! Grab a handful of Strawberries, Blueberries and Raspberries. Blend them with a cup (or two cup) of Greek Yogurt. Pour them in your favorite Popsicle mold, then put it in the freezer for 1 hour (or until our Popsicle freezes). And your Popsicle are ready to enjoy!
    5. With Cheese: If you guys are a cheese lover, then you will surely LOVE this. This is simple, but satisfying. All you need is your Strawberries and cheese. You can have it on any amount that you would like. Eat the together in one bite. You can have them for Appetizer, as a snack, or for dinner. Perfect right?
chocolate strawberries
Image taken from: domesticfits

So that is the 5 ways i like to enjoy my Strawberries. Tell us how do you like to enjoy your Strawberries. And don't forget to Tell us want food to write next on the comment section. Until net time! BYE!


5 Fun Lunch Ideas For Kids

Thursday, 14 May 2015 / No Comments
Hi there! So, my neighbor is having problems with her kids cause they wont finish their lunch or wont eat them at all. Her kids told her, that they are tired of the same lunch everyday, which is: jam filled bread. So, i think this ideas of fun lunch will help her with her kids lunch!!

5 Fun Lunch Ideas For Kids

5 fun lunch
Image taken from: clipart

  1. Melted Cheese and Smoked Beef Roll: This is easy to make if your a busy mother. Roll up a slice of Cheese topped with 2 or 3 slices of Smoked beef/Bacon in a slice of white bread. Make sure to roll it tight or secure it with toothpick while baking it. bake it for 5-10 minutes until the bread is golden and the cheese is melted. if your using toothpick, don't forget to remove it!
  2. Caramelized Fruit: Melt some sugar with water and while it's still hot pour the caramel liquid to the Fruit that you've (or your children) chosen. Don't over cooked the sugar while melting it, otherwise it'll burnt and taste bitter. it also is not good for your kids health. If you have a caramel syrup, you can put it in a different container so the syrup will act as a sauce.
  3. Character Shaped Sandwich: You can use your favorite Sandwich Recipe, just mold/form your bread into you kids favorite character. You can find various bread Molder online with various character.
    food for kids
    Image taken from: buznet
  4. Cheese Coated Vege: You can use any vegetable and your kids would still love this! Cook the vegetable that you chose until half cooked. Then put it in a pyrex pan or any Oven-able pan. Put some Cheese on top of the vegetable, then bake it for 10-20 minutes until the vegetable is cooked and the cheese melts.
  5. Oven Baked Macaroni Cupcake: This is your ordinary Mac and cheese recipe. or you can use any macaroni recipe that you like. The only difference is, after you cook you macaroni, put them in to a cupcake pan, then bake them for 10-15 minutes just so the shape stays.
fun lunch with kids
Image taken from: iowagirleats


So, i hope this article helps you with your kids lunch. If you have any other creative ideas of kids lunch, be kind to share with us. And don't forget to Tell us what to write next on the comment section.


Until Next time! BYE!!

How to Make Penne Pasta

Wednesday, 13 May 2015 / No Comments
Happy Wednesday everyone… have a great day. Today our star is still Italian food. I already posted about fetuccini and lasagna before, and we will see the other pasta this time. We will talk about Penne pasta. I think this pasta is so much beautiful because of the shape and also its so tasty. Lets check the recipe below…
Image taken from: www.food.com

Ingredients:

·         1 (1 lb) box penne
·         2 tablespoons butter or 2 tablespoons margarine
·         2 garlic cloves, minced
·         2 tablespoons flour
·         3⁄4 cup chicken broth or 3⁄4 cup beef broth
·         3⁄4 cup milk
·         2 teaspoons parsley flakes
·         salt and pepper
·         1⁄3 cup grated parmesan cheese

Steps:

1.       Boil the penne pasta with lightly salted water. Boil until 10 minutes. Then drain the pasta.
2.       In the saucepan, melt butter and then add garlic. Cook in the medium heat for 1 minute. Add flour, stirring constantly for 1 minute. Broth the milk and cook until the sauce boils and thickens.
3.       Add parsley, salt, pepper and cheese. Stir until all the cheese melted.
4.       Pour the sauce in the top of pasta.

And now you have your penne pasta ready to eat. The best reason for me to love pasta because they are very simple to cook.
Have a nice day…

How to Make Lasagna

/ No Comments
Hello everyone… how was your day? I hope you can enjoy every time that you got in your life. Talked about life, this morning I watched my favorite cartoon, Sepongebob Squarepants. Are you a fan of Sepongebob too? Today episode is about be grateful. Spongebob told Squidwad that he need to be grateful for his life, because everything was possible to be worse than this. This time is special time.
Image taken from: www.bbcgoodfood.com

Well, today I also want to share the recipe of my special food. Its Italian food and so much delicious. Yes, its Lasagna. Lets check this out…
Ingredients
·         2 tbsp olive oil, plus a little for greasing
·         750g lean beef mince
·         90g pack prosciutto
·         ½ quantity tomato sauce
·         200ml hot beef stock
·         a little grated nutmeg
·         300g fresh pack lasagna sheets
·         ½ quantity white sauce
·         125g ball mozzarella
Steps
1.       Firstly you can make the meat sauce. Heat the oil and cook the beef for 10 mins until browned. Chop 4 clices of prosciutto and mix it with the meat mixture.
2.       Add the tomato sauce and stock, the nutmeg, then season. Simmer the sauce for 30 mins until its looks rich and well coated.
3.       Heat oven to 180C/fan 160C/gas 4. Lightly oil an ovenproof serving dish (30 x 20cm). put three spoon of the sauce, cover with lasagna sheets.  Put the sauce again, and then put the lasagna. Repeat until you have three layers of pasta. At the top cover with the sauce.
4.       Tear the mozzarella into thin strips, then scatter over the top. Arrange the rest of the prosciutto on top. Bake for 45 mins until the top is bubbling and lightly browned.
Its so simple to make lasagna right? I hope you can try this one at home. See you next time…

How to Make Fettucini

/ No Comments
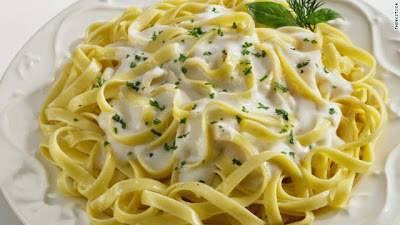
God day every one... how was your wondelful day? Is your business make you buzy? I hope you can spare more time to relax, because in this modern era people can’t stop working and stressing. You can take a rest for a while and enjoy your favorite food.
How To Make Fettucini
Image taken from: http://eatocracy.cnn.com/
One of my favorite food is pasta. I love many kind of pasta food. I already posted about how to make lasagna, and today I want to share about the other creamy pasta. Its is Fettuccini. Let’s see the recipe below…

Ingredients:
  • 24 ounces dry fettuccini pasta
  • 1 cup butter
  • 3/4 pint heavy cream
  • salt and pepper to taste
  • 1 dash garlic salt
  • 3/4 cup grated Romano cheese
  • 1/2 cup grated Parmesan cheese

Steps:

1. Boil the fettuccini with lightly salted water for 8-10 minutes or until al dente. Then drain the fettuccini.
2. In the saucepan, melt butter in the low heat. Add salt, pepper and garlic salt. Stir with cheese over medium heat until melted.
3. Put the pasta to sauce. You need to use enough pasta to make sure all pasta is thoroughly coated.
4. Voila, your fetuccini is ready to serve. Its just take 15 minutes to make this pasta. Happy eating…

The History Of Pizza

Wednesday, 6 May 2015 / No Comments
The History Of Pizza
Image taken from: boston
Hi there everyone! Welcome back everyone! So, in the past weeks all my family's been eating was Pizza. Yup you got it! From the vege pizza to the meat pizza. We've ordered it all! And i hate to admit it but, i kinda grew tired of it. But, apart of that, since i have been consuming it for the past weeks... today i'm going to write about Pizzas!  Enjoy everyone!

what is pizza? pizza is basically an oven-cooked flat bread with topings, which was usually meat, tomatoes, and cheese. Ancient greeks covered their pizzas with oil, herbs and cheese. While the romans invented placenta cake ( a dough covered with cheese and honey, and flavored with bay leaves). 

Pizza was brought to the states, by the Italian imigran during the world war II. The countrys first pizzeria ( pizza place) is called Lombardi's and was opened in 1905. Since then, Pizza was a popular dish in United States. 

Until now, the most authentic pizza is the Neapoletana Pizza from Italy. The topings consist of San Marzano's Tomatoes and Mozzarella Cheese. Another authentic pizza is the Sicilian Pizza. A thick-crust Pizza originated from sicily on the 17th century.

Cuisine Pizza
Image taken from: twinfinite


So, that's all from me today guys! I hope you enjoy the article. Let us know what to write next on the comment section. Don't forget to order pizza today! Eat it with a cup of cola, and your dinner will be perfect! Until next time, BYE!


About Cheese

Tuesday, 5 May 2015 / No Comments
Hi there everyone! Welcome back to Our Foods and Cuisine blog. So, today i will be writing about Cheese. Who doesn't know Cheese? even the Tibetan and Mongolian people who lived in the mountains are familiar with it. And i think that the whole world is obsessed with Cheese. It's like the garnish and the complementary side dish that you can't miss to have in every meal.

The word "Cheese" came from a Latin word 'Caesus' or Caesin which means "To Ferment" or "Become Sour".
About Cheese
Image taken from: pinimg

Cheese came from milk with various flavor, texture, and forms by Freezing the Protein of milk. Cheese usually contains the fat and protein of milk, and usually mad from Cow's, Buffalo's, Goat's, or Sheep's milk.

Cheese is Valuable because it can be stored for a long time, and has a great amount of calcium, fat, protein, an phosphorus.

To be a Cheese expert or Cheesemonger requires a formal education which consist of years of tasting and hand experience. Once you become a Cheesemonger, you are responsible in selecting cheese menu, purchasing, ripening, receiving, and storing the Cheese.

The History of Cheese
Image taken from: wikipedia

Cheese is an ancient dish. There are no evidence to whether where the first cheese making was originated. But, the practice of Cheese making was spread in Europe during the Roman time. In archaeological records, the oldest evidence of cheese making was trace back to 5,500 BCE in what is now known as Kujawy, Poland. And the earliest record of Cheese preserving was traced back to 1615 BCE in the Taklamakan Desert in Northwest China.

The Cheese making process was probably an accidental discoveries. Around 8000 BCE, animal skin and internal organs was provided as storage vessels for foods. And while storing milk into a container made of animal stomach, the milk turns into curd and whey.

In the Roman times, Cheese making was considered mature art. Pliny's Natural History (77 CE) describes the variety of Cheese that the Roman's enjoy in the early Empire. The best Cheese was made in the villages near Nîmes, but it didn't preserve long so it had to be eaten fresh.

In the pre-Colombian era, Cheese was only popular in Europe and was not familiar in east Asian culture. Later on, Cheese was brought and introduced to the world by the European Imperialism and in the Euro-American culture, Cheese was known worldwide and increasingly popular. In the 1860s, Cheese was produced in massive manner. And during the World War II, Factory made Cheese overtook the traditional way of making Cheese.

So, that's all from me today guys. Hope you enjoy reading the article. Until next time! Bye!